Saturday, June 16, 2012

Busy, busy, busy!

Well, I know I said I was going to try to be more regular in posting here, but this past month, I just haven't had the time. Today, though, my dog and I are recovering from a week of being very sick, so I thought I'd try being at least a little productive, and write something here! Here's one product from the past few weeks:


But I'll come back to this one... First, I should touch on a few other bits of fun from the past few weeks!

So, I spent some of the time to help finalize the design for the Lovespoon collaboration with David Western and two other artists. It is to be raffled off for Americymru's West Coast Eisteddfod; I participated in the always fun Celtic Beltane Festival in Hartville, Ohio; and I worked on some lovespoon commissions, too.

At the Celtic Beltane Festival, we lucked out and had a beautiful day of weather! I saw a lot of familiar faces, and for the first time, I was able to break away for a bit, and watch a friend of mine participate in the Caber Toss - he even did his first perfect throw! Those Highland Games guys are serious rock stars, if you ask me. Wow - that was fun to watch! Here's my little booth, with the few simple spoons that remained near the end of the day. You can also see more about it and other Ohio festivals at this nifty website all about Ohio festivals!


You may be able to see the little spoon I'm working on, there on the left side of the table. More about that later... Here are a few pictures of a couple of other commissions I finished in the last month:

A lovespoon commissioned as a gift for some folks in France...

Then, another commission for a first wedding anniversary (the "paper" anniversary)...


Maybe later I'll come back and share a few of the challenges that I encountered on these. For now, though, I feel more like discussing that little white spoon from above... This was a lot of work - you can probably just scroll through the pictures, but I added in some notes, just in case anyone might be curious. So - be warned - this is another long one!

Anyway, this was a commission for a tenth anniversary. The person who commissioned it had lots of ideas to include in the spoon, and even though I knew I was over-designing it a bit, I was inspired, and my client was really excited about the spoon, so I allowed myself to get carried away in the design, and probably included many more elements than I should have. One of the bits of heritage he offered to be included was Pennsylvania Dutch, which has its own tradition full of symbolism called "Hex" (or maybe Hechs) signs. So I designed and incorporated one of those, as well, which meant an area of relief carving some fine details, which actually allowed me to somewhat concisely include a few additional bits of symbolism. I'm not going to go through all the symbolism here, though. Suffice it to say - this one is PACKED FULL of meaning.

One interesting challenge that comes with commissions is estimating the time they will take. On this one, I knew I was significantly over-designing it, but I didn't care - it was fun! But I still kept careful track of the time I spent, so I would know how good my estimating is getting - and I'm pleased to report I finished it only 1.5% over my estimate!!! So, I've apparently gotten pretty good at estimating. The main themes in this spoon, anyway, are all seasons, a few different kinds of heritage, family, and faith. (and that's just the general stuff)

So - Here are - well - LOTS of pictures showing the progression of this spoon... starting with cutting the blank from a 1" thick holly board. I really love holly, but it's hard (so cuts and carves very slowly!)


In this picture, it isn't all the way cut, but you get the idea. This was about 2 hours into the sawing. Later I decided that next time I do a sunflower, I don't think I'll cut the petals - just the circle, instead. It's  just not necessary, and I think the flexibility of not defining the petals until later would be better.

Then, I got into the carving. Here it is after 10 hours...


I tried to start in some of those areas that were a little challenging to reach, just to get them out of the way. However, I also didn't go far with that Moravian Star at the top, because I figured carrying it around, I'd break off some of the corners, so I didn't want it to be the finished corners that I would inevitably break! Luckily, though, holly is so strong, and I was careful enough, that even those rough corners survived pretty well, until I cut them away near the end. Deciding the depth of everything was one of the big challenges, knowing that I'd eventually cut away a lot of the back of most of the spoon. With most parts, I managed to cut down the levels pretty much how I wanted, up front, but with that darn sunflower, I kept changing my mind. So I probably spent maybe as much as ten extra hours, just changing my mind and re-carving that whole thing to make it lay on a slightly different plane. In hindsight, I'd have been better-off had I just cut down the surface of a plain circle, until I liked where it was, and THEN drew in and carved all the detail of the petals. Live and learn. :)

Well, here are a few more pictures as it progressed...


So, except for scooping out most of the bowl, and working on that star, the front was mostly where I wanted it. (Well - and that sunflower - it changed yet a few more times...) So, now it was time, I thought, to get down to it with that star. It was an interesting challenge, because it's normally a spherical thing, so I had to kind of make up how I wanted to represent it in this "squished in-the-round" format. It couldn't be literal, but you still had to know it was a Moravian Star. Also, I'd need to be very careful once I carved away to where all those points actually would be, as points are always very fragile.


And then, I thought I'd save the undercutting of those front layers of the star until later - to at least give the points a little support until I absolutely had to take them off. You'll notice those front points aren't all quite even lengths, either - I figured I can make those more even when I undercut them. For now, then, on to the bowl! When I think of it, I usually like to start with the outside (backside) of the bowl.


That took about 2 hours... and then, on to all the rest of that extra wood to take off of the back! Boy - that's a lot of very hard wood!


Before I go too far, though, there's a lot of interweaving of stems and leaves and a cross down in that section above the bowl, so a lot of fully 3D sculpture. And once again, I just made up something for the back of the star, and put it off until later...

With the back of that Hex sign, though, this was one of the first time I really thought some sort of power carving might be a good idea. Usually I have too many dimensions and details interweaving through the back sections, too, but the back of that circle really didn't need detail, so if I'd wanted, I wouldn't have felt too bad (and probably would have saved a couple hours of work) to have power-carved away some of that waste. But, instead, I just used my trusty gouges.


And then I didn't take pictures for a while... and just worked at those tulips surrounding the cross....


So, now we're really just about there... Here we are with all the carving complete, and even a touch of the sanding begun...


But, then, the bowl is still pretty clunky... the rest of it is probably about a third of the mass it once was... So - as a last step, just to finish scooping out the bowl, so it's pretty thin and relatively even all over. Another hour, and I'm just about there. I do end up leaving it somewhat thick near the top of the bowl, just to give it a bit more strength, and also because I just liked the shape at that point.


And then - many many hours of sanding. Lots of details, lots of points to avoid breaking, and lots of grits of sandpaper to go through! Meanwhile, my dog got deathly ill.... so a lot of sanding was done waiting around at the Veterenary hospital... good thing I thought to bring it along!

Anyway, I sanded to about 600 grit, then doused the whole thing in water to bring up some fibers. Usually it doesn't take long to dry, but holly seems more thirsty than a lot of other woods, so it really took a long time to dry. Once it dried, though, I had another pass with the 600 grit, then went on through the rest, all the way to 12,000. Here's what it looked like, sanded:


Such a pretty, creamy color this holly has. Now, usually, I'd finish with both oil and wax, but I've been talking to some people about finishing things in just wax, and I thought this was an occasion that really called for that.
So here it is, finished...


Notice the strange mark - it's apparently a knot - that runs the whole length of the spoon. I guess I didn't think knots would run that long. This is 18 inches long - that seems like a long knot to me, but I don't know much about how they form, so - maybe it's not strange after all. Anyway, you only see it on the back of the star and the bowl, because it was only about 1/4 inch deep, from the back plane of the board. Everywhere else, I carved away between 1/4 and 1/2 inch of the back of the board.


So, there you have it - from beginning to end... 


Sunday, May 6, 2012

Wood. The traditional 5th anniversary gift.


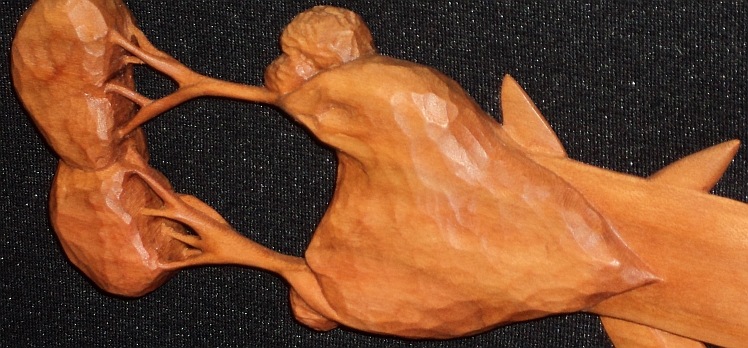
Ok, this one is no longer a secret, so I thought I would post something here. When I finished this recently, I carried it around with me for a while, asking everyone I encountered "Can you tell what this is?" (other than the dragonfly and the trees, that is). Most everyone could tell, which I figured was a good sign. I was worried, because it's something that I, at least, found a little challenging to represent in this format. So I was always worried about whether I took the right approach.

In any case, it was a pretty fun spoon to carve. Lots of interesting little challenges. Distinguishing different parts with different textures, deciding the right order in which to carve everything with lots of fragile points, thin protrusions like dragonfly wings, and tiny little tree branches, all  somewhat in the way while another part had to be carved or sanded or waxed, etc. It was quite a design challenge, along with a carving and finishing challenge. All around fun, though. Luckily, I was asked to do it in Cherry, and even more fortunately, I chose an especially old and very very hard piece of cherry, which really helped in preserving the tips of all those fine little points, in particular. I managed to fit all those flimsy extensions and points into places that fit nicely into my hand so I always had a good, secure way to hold it and carve or sand or buff the piece, throughout the process. It was some pretty involved planning, but I was pleased that it actually was a success!

And, here are a few closer views of the branches, as well. They might have been the most fun.

And then, in case you can't tell what the main part of the spoon was, it was a waterfall. And, so, the parts I left off-the-tool (other than the tree-tops and shrubs) are meant to be land, or rocks. Then, the smooth, polished stuff is the water. Then, there's some mid-finished stuff near the bowl that may look like more rocks, but that's actually just meant to be a rougher finish, because it's intended to be the water, landing - it's the "spray." So - about half-way down the spoon, the water is hitting more rocks, including a rock in the middle - I was sort of envisioning a cave. There, it splits, then hits more rocks at the sides, then comes back together in the middle, so the water forms a heart. I admit - I kind of wanted to make a heart because this is actually an anniversary spoon. It's for a 5th anniversary. Did you know the 5th anniversary is the "wood" anniversary? What more perfect 5th anniversary present could there be than a Welsh Lovespooon?!!!

Anyway, I can think of all sorts of ways to represent a waterfall - it's an interesting challenge to represent it out of wood, and in the form of a spoon. Waterfalls are really more about the land than the water, I think. I wonder, if I'd sat down to draw it a day before or after when I did, what different kind of image I'd have made. I think it's one of those things where there are just so many possibilities.

Also, I could easily have set up a couple of rocks in my kitchen sink, and poured some water on them to see how it actually fell, and probably have made a more realistic representation that way, too. I actually seriously considered that, but then opted against it, because sometimes I just think it's more fun to see what happens with imagination, instead. I don't know what is the right choice - the results can be so very different, after all. My imagination can be so very very misguided sometimes. ;)

Well, anyway, I'll leave you with a few closer pictures of the lower half.


Meanwhile, I've got lots of other top-secret work to get back to doing! ;) Well, stuff I won't post on the internet yet, anyway. Not to mention more work to do on the spoon I'll be making with David Western for Americymru's West Coast Eisteddfod! You can check that out at David Western's Blog, too. There should also be a new update there very soon.

Saturday, April 14, 2012

Spoon bowls...

So, I've been having a little trouble deciding what to write about while I've been working on some commissions that won't be given to their recipients for a while. So today, I thought I'd talk about bowls.

I've been giving a lot of thought lately to bowls. There are a lot of ways to approach them. They can be shallow or deep, thin or thick. They can have a curved lip or a flat lip. The bowl may be in line with the handle, or at a different angle from it. It can be oval, heart-shaped, egg-shaped, round, triangular, pear-shaped, tear-drop-shaped, marquis-shaped, or any number of other shapes, I suppose.... There are a lot of ways to approach a bowl.
So... here are bowls from some of my very first few spoons... As you see, it took me a while to tear myself away from making a heart-shaped bowl.


To some not quite as early bowls...


And then a few that were deeper....


And then, you'll remember those workshop spoons....


And then a few more varieties for good measure...


I have always kept my bowls somewhat in line with the handle of my spoons, probably more out of convenience than anything, because I generally begin with finished boards. However, more and more, I've been taking advantage the thickness of my blanks to change that angle of the handle in relation to the bowl, having the handles bend back and away a bit from a level-topped bowl. I do think I like the idea of keeping the top of my bowls level, since the point of a spoon, after all, is to hold liquid, and any part of the lip that isn't level would just be extra, and probably in the way. So I could see having a little extra over level near the attachment to the handle, but otherwise, I see little reason to do it.

But then... I have seen some really lovely spoons with a rather pretty "swoop" to the shape of that top lip of the bowl... instead of a flat plane. When you blend that with the handle, I can see that making for some very pretty shaping. And, after all, lovespoons are decorative, not utilitarian. But I haven't really explored it yet. I have, however, been thinking more and more about it. Of course, that also means I should get my band saw set up..... hmmm...

Also, I've been looking at some spoons lately - more the ladle type, and I think the old Welsh cawl spoon (from which the lovespoon has been said to have evolved) may have been more of a ladle type, with the bowl tilted forward a bit. For real, utility spoons, the grain would be really important with a feature like this, and cutting the blank might be quite a challenge - I suspect using limbs with a certain bend in them is probably a good solution in many cases. I'll have to give more thought to whether I want to venture into that sort of profile for my spoons, though.

In any case, I suppose the point I intended to make when I sat down today was this: I think it's good to think about bowls... experiment with them, explore them.... the bowl is the core of a spoon, and should be given due attention. I'm sure the style of my bowls will continue to evolve, and I hope anyone else out there making spoons will give bowls a little extra thought, as well. 

Sunday, April 8, 2012

Celtic Relief Carving part II

Well, here we are, and I've been through the second half of my Celtic Relief Carving class, where I was making a Lazy Susan. This week, we did the over-unders, and the stain. (well, some of us did. ;) ) I realized we could have done the over-unders during the week in-between so we could be closer to ready to stain them, but he hadn't given us his tips on that part yet, and I wanted to see what good tips he might have. So, here's where I left off before going to the second class session, having finished up all the negative space, including a space around the design to a circle I drew inside the edge of the board.


And he DID have some good tips! Some of what he was suggesting for the over-unders (well, I suppose it was really the "unders" that we were carving) was stuff with which I was familiar, about using a flat chisel (or skew) that wasn't too narrow or too wide so you didn't leave lines or make nicks in the sides of ribbons where you don't intend to, and part was about working with the grain. Now, I knew how the wood reacts when you go the wrong direction across (especially diagonally across) the grain, so that rather than closing upon itself like you want, it tears itself apart as you slice. But I still get mixed up sometimes and choose the wrong direction. It's probably just me, but in case anyone else has this little mental block, here you go...

Well, Wayne, being the excellent teacher that he is, shared this pearl of wisdom with us, which I'd somehow never paid close enough attention to figure out for myself: You cut from the shorter grains to the longer grains. A little part of me said, "duh" but really - I'd just never thought of it that way before - but that's exactly the right way to think about it. Unmistakeable. Thanks, Wayne!

So, I got started on my over-unders, being as careful and clean as I could.... but even though I was pretty clean, I found I like my ribbons to curve under, rather than just being an angle, so I ended up making lots of facets, which were clean, but not very regular or interesting. I could see some sanding in my future. Here's how they were coming out...


Then, for those ready to finish, they cleaned up their pencil marks with some 220 sandpaper, and then Wayne brought his wife to show us their finishing process. To my surprise, it was just one coat of colored wax. a series of applications and removals with rags, brushes and more brushes, all a section at a time and very quickly, until it was all covered and buffed up. Really a beautiful finish, and a remarkably simple process! I think I'll probably try it on  mine, too - though, I wasn't as far along with my carving, so I haven't done that yet.

After considering it just carved, with all the tool marks, I thought, I think I'd like the ribbons to be smoother, and I have a lot of pencil marks to remove anyway, so maybe I'll just sand the ribbons, but leave the negative spaces "off the tool." So - I did - I went over all the ribbons & outside part of the board with 220, and then, because I apparently just can't stop myself, went over them again with 400. Probably unnecessary, although they did say that the pencil marks don't matter much if you're using a darker wax color. But - I hadn't decided yet.

So - here's how far I am now. I think I do want the darker color, so I'll have to go get some. This sure was a fun project, and if anyone has the chance to try something like this. It probably took a similar amount of time as a simpler spoon, too, so that was good to know, too.


Maybe some day,  I'll try a chip carving class. :) But for now - it's back to spoons! I have a lot of spoons to finish in the next few months! And to all of you, happy Easter and happy carving!

Friday, March 30, 2012

My first carving class

Well, I know I've been  neglecting my blog for a few weeks now, but that's mostly because I'm working on commissions I'm not ready to publicize yet, and I've also been working on a complete re-write of my website (which has me learning new languages and all sorts of fun stuff, but not even a little interesting from a carving perspective, so I figured there was no point in writing about that here, either).

You may recall that I mentioned having felt a little strange being asked to do that workshop a few weeks back, when I'd never even taken a carving class myself, apart from one quick Santa carving thing at a local club. So I didn't have a whole lot of idea of how a class should really go. Still, that one I did seemed to have gone ok. But, then, last  night, I finally attended my first real, full-fledged carving class! It's Celtic relief carving, with a very nice fellow named Wayne Cruze, who has been doing Celtic relief carvings very successfully for many years. We're making a lazy Susan with some Celtic knotwork relief-carved into the top.

I've been meaning to take this class for quite a while, but it seems like I'm always out of town or something when it's offered. I'd seen Wayne's carvings since I started carving, and always admired them and wondered some things about his process. Then, people had referred me to him early on, when they learned that I was making lovespoons, since there's often a lot of Celtic knotwork there, too. Around here, he's "the guy" for Celtic carvings. :) I did get to meet him a couple times, and I've always really enjoyed talking with Wayne, so was even more looking forward to eventually taking this class. Anyway, I finally made it this year, so I am quite excited about that. I was wondering about how he got such a nice-looking finish, among other things. Well - the main answer seems to be that he carves very nice & cleanly. Me, not so much. I'm a little spoiled by lovespoon carving, which usually involves extensive sanding. However, I have been trying to get better about carving cleanly, as even when you're going to sand, it takes away a lot of extra work if you carve cleanly to begin with.

So.... I'm carving away on my stop cuts, and he comes by and is looking a little puzzled at me, surprised that I'm making my stop cuts with my double-beveled skew. I said, well, I forgot my chip carving knife (I actually do have one). But I do like my skew. :) So, when I got home, I got out my chip carving knife, and started trying to drag it through the wood to make more of the stop cuts... sure seemed a lot harder than it was with the skew (though, I'll admit, the hold was more comfortable). And then it slipped a few times, and even resulted in a couple nicks into some of my "over" ribbons - which made me say "Grrrrr." And then I switched back to my skew to finish off the stop cuts. Yep... I guess I'm just not a knife person! Oh well. More power to all you knife carvers out there - I guess I'm not among you. :(

Anyway, now I'm through the stop cuts, and getting into all the little negative spaces (apparently, in next week's class - it's a 2-part class - we'll work on the over/unders, and then the finishing, which is another part that really interests me). Some of my stop cuts are a little wobbly-looking (mostly ones I did with that stupid knife),  but I suppose they're ok. Also, I was a little surprised to find that it was acceptable to make stop cuts that would be deeper than what I cut away next to them. Still - as I started into my first negative space, it's not clean - so I take it a little deeper.... still not clean. A little deeper..... ok, I guess this is good enough... and then Wayne comes by - gee - that's pretty deep. It's hard to get tools all the way into those corners like that. Again, I laughed at myself, and said, yeah, I suppose you're right about that. On the other hand, I suppose I'm not too afraid of getting tools into little corners... but more importantly - I just had to go that deep in order to get a clean cut. So now I have to do that the whole way across the piece. Creating more work for myself - yeah, that sounds about right. :)

Then, I had a revelation about something: I guess I've always thought the side (?) cut had to meet the bottom depth of the stop cut. But, then, I realize, it really doesn't - and thinking it through, in relief carving, it doesn't seem like that would always matter. I think it matters a little more in lovespoons, just because they are something between relief and in-the-round, and strength can become an issue - not to mention, if I made a deeper stop cut, you'd probably see it from the side. But you wouldn't in this relief carving, so - I felt like that was a really good revelation, and took a lot of pressure off. I mean, I still don't want to make huge crevasses, but  cuts at the bases of the ribbons would actually do nothing negative, and would probably add something to the shadow.

So, here is where I am - as far as I got before I went to the eye doctor and had my eyes dilated today (now I can't see up close). I am finding I really am getting a lot cleaner, the more I practice, which is great - didn't expect it to improve that quickly. And if I'd only been that way from the start, I wouldn't have to carve so deep, which, of course, is actually  making it more DIFFICULT to carve cleanly, since it IS harder to get the tools in there. Still - that particular thing isn't so strange for me - just takes longer. So, I don't know - I think I'm getting there. I have always liked the look of chip carving, but have been afraid of it. To me, this feels like a looser version of chip carving, and I quite like that, so I'm really having fun with it! And next week, we'll do the over-unders, and I'll get to learn something about stain, too. (stain has always very much intimidated me, so I'm really looking forward to learning about that, too.)

So - Carving class is GOOD! I quite like it! Maybe some day I'll get brave and actually try a chip carving class, too. Hmm... we'll see. :)

Edit: Bob, your comment reminded me, I meant to say - flat plane carving was exactly what came to mind as I started cutting into those negative spaces. I still don't know how clean I am cutting, but I'm definitely improving. And David - I share your apprehension of kohlrosing and chip carving - I really think this is a good compromise to both, and I am also very happy with the idea of having a nice lazy Susan. Very practical, this stuff. And, it is also surprising me a little how quickly it's going - but, then again, it's basswood... ;) We'll see if I ruin it with stain, though....

Anyway, thought it might be helpful to show a bit closer picture so you can maybe see better how I've got that flat plane thing in mind.  Then, we'll see if I destroy it by next week....

Friday, March 9, 2012

A busy week...

It's been an unusually productive week, with St David's Day events, finishing up some projects, starting some others, and finally, my very first attempt at giving a lovespoon workshop!


I was recently invited to speak about Welsh Lovespoons at the near-by Radnor Heritage Society's St David's Day luncheon. Radnor is a little Welsh-settled town about an hour North of Columbus. Many of the people there had seen Welsh Lovespoons, but may not have been familiar with the history and tradition behind them. So I was delighted to have the opportunity to share with them a bit of what I've learned. I also brought along some examples of finished spoons, and a couple works in process, too. That included the teeny tiny spoons I was just finishing, that were made from some walnut from that very same town (Radnor). The group seemed to enjoy my little presentation, and hopefully the talk contributed a little towards perpetuating the lovespoon tradition, too. It was a very nice day (including a delicious lunch with yummy leek soup and locally raised lamb), and I hope they enjoyed me as much as I enjoyed them! What a nice group of people!
And, by the way, a couple days later, after the oil had dried, I did finish the final coat of wax on those tiny spoons. I will admit: buffing off that final coat of wax on those little spoons was indeed the scariest part of making them. I felt like they were in more danger of breaking then, than at any other point. BUT, I was careful, and they did survive! Here they are, all finished up. The pictures are a little bright, but you can still see how pretty the wood is.

Tuesday morning, I was able to meet the woman who brought me this wood from her old family house in Radnor, and she seemed to really like them, and said she planned to put them in a picture box framed with more of the same walnut, so they have a pretty and sentimental remembrance of their old home. It's very gratifying to be able to play my part in a family's history like this. And, I also asked her to remind me how old the wood actually was, and she said the house was built in 1852, so it was at least that old. I'm told that a lot of houses in Radnor used walnut, because there were lots of walnut trees growing there.

Then, between Saturday and Tuesday, I did a little designing for a commission that I'm sure will eventually show up here, and also made some final preparations for my very first Lovespoon carving workshop on Tuesday evening! The workshop was for the "Land of Legends Woodcarvers" in Newark, Ohio, who meet right "down the street" from me (well, a few towns away down the street, anyway).

This was my very first attempt at doing something like this, so I was a little nervous.
I arrived as early as they told me I could, to allow for traffic (kinda far, and it was rush hour), and so I could lay out some visual aids (including the finished examples I've been describing in excruciating detail the past few weeks!) and get settled. I was surprised to find several carvers already there, since the start time was still an hour and a half away. I had no trouble using that extra time, though.

Now, my main hesitation when I was first asked to do this was that I really didn't want to cut out so many blanks. But they offered to do that for me - I just provided the pattern, and told them the thickness of the stock I wanted them to use. So that was fantastic, and I happily agreed! When I saw that box of blanks, I was just so  happy I didn't have to cut them all! Another thought I've had while planning for this was that while I can certainly tell people and demonstrate what I like to do, that doesn't mean it's right. It's just how I do it. I hope I never came across as though I knew the best way.

Once we started, I talked for a bit about the history of the tradition, a few key details of the spoon that I hoped they'd consider and try, barked at a heckler (a friend from my Tuesday morning carving group who was in the room), and through all that, probably went off on lots of tangents. I'll definitely try to clean that up next time. Then we got started carving.
I talked with pretty much everyone, and got lots of questions and we all shared theories about things, which is always fun. I also went around & showed them my bent knife and how to use it, because it's a really handy tool to have for spoons! 
It was interesting to see how far anyone actually got, and what tools they liked to use. I did see a lot of knives, which I expected. I wonder if the whole thing was more educational for me than it was for them, even.
Thinking back over it, there are several things I'll probably do differently when I do this for another carving group in May (especially talk less at the beginning), but overall, I felt like it was well-received and it seemed to go well. I certainly enjoyed it, and I hope they all did, too. I was especially glad that I had made those sample spoons, because most people got to pick them up and handle them, hold them up to the light to see how thin some parts were (yet still plenty strong and stable), see and feel the actual final finish, see the tools and sandpapers I use, etc.. You lose so much of that stuff when you just look at pictures, especially pictures from my silly little camera. :)

In any case, THANK YOU, Land of Legends woodcarvers, for inviting me out there, being guinea-pigs, and listening to me talk a whole lot! I hope I was able to encourage some more people to try carving (and maybe even designing) some lovespoons! Happy carving!